 Pin This
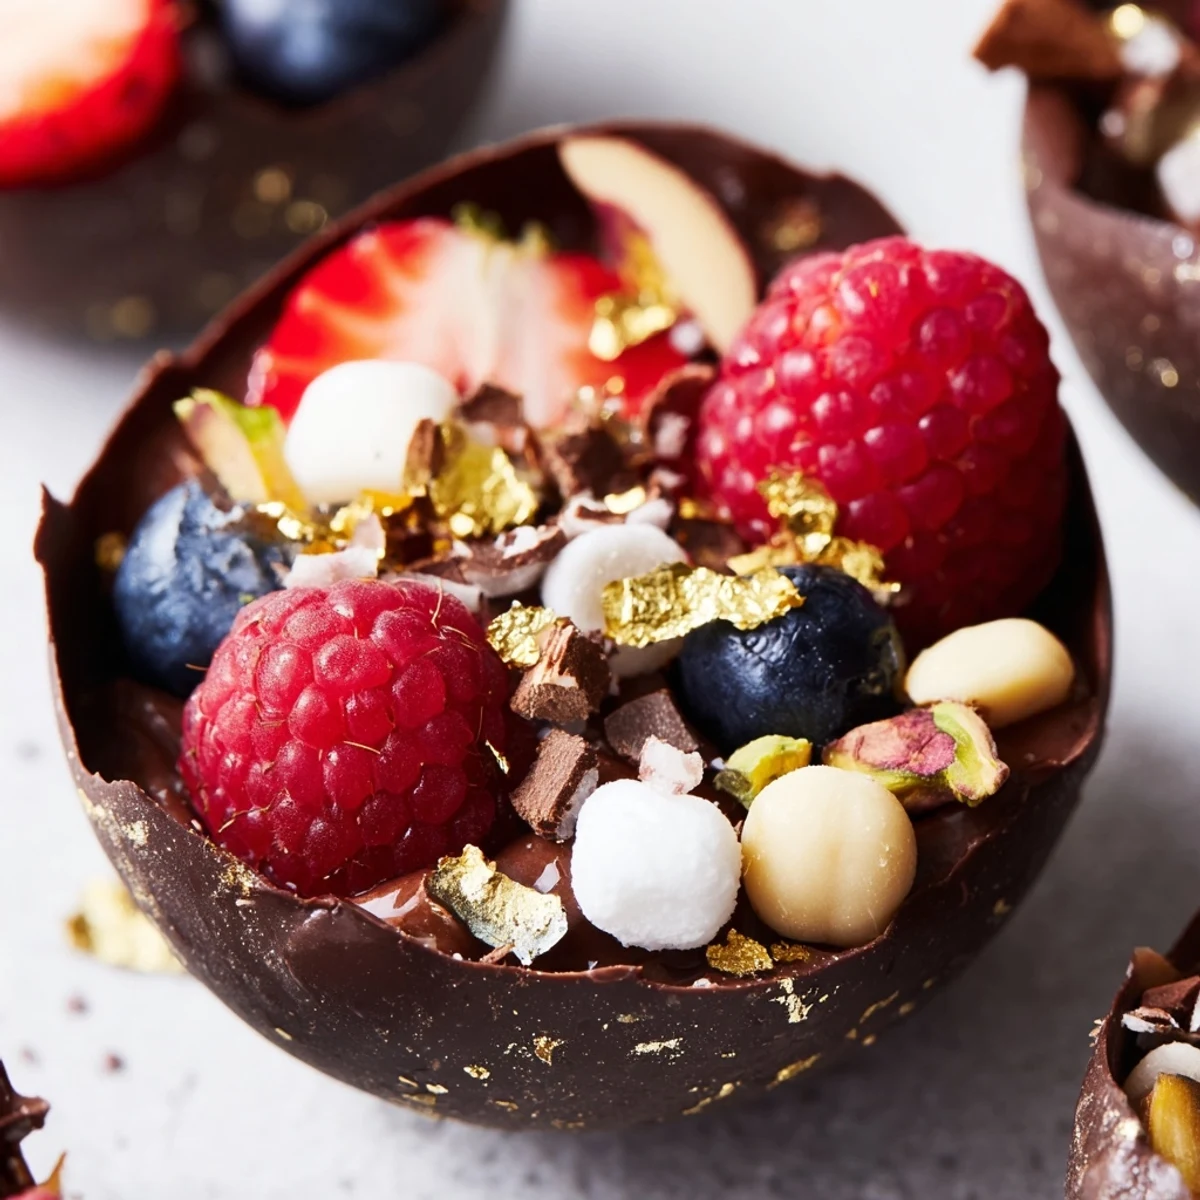
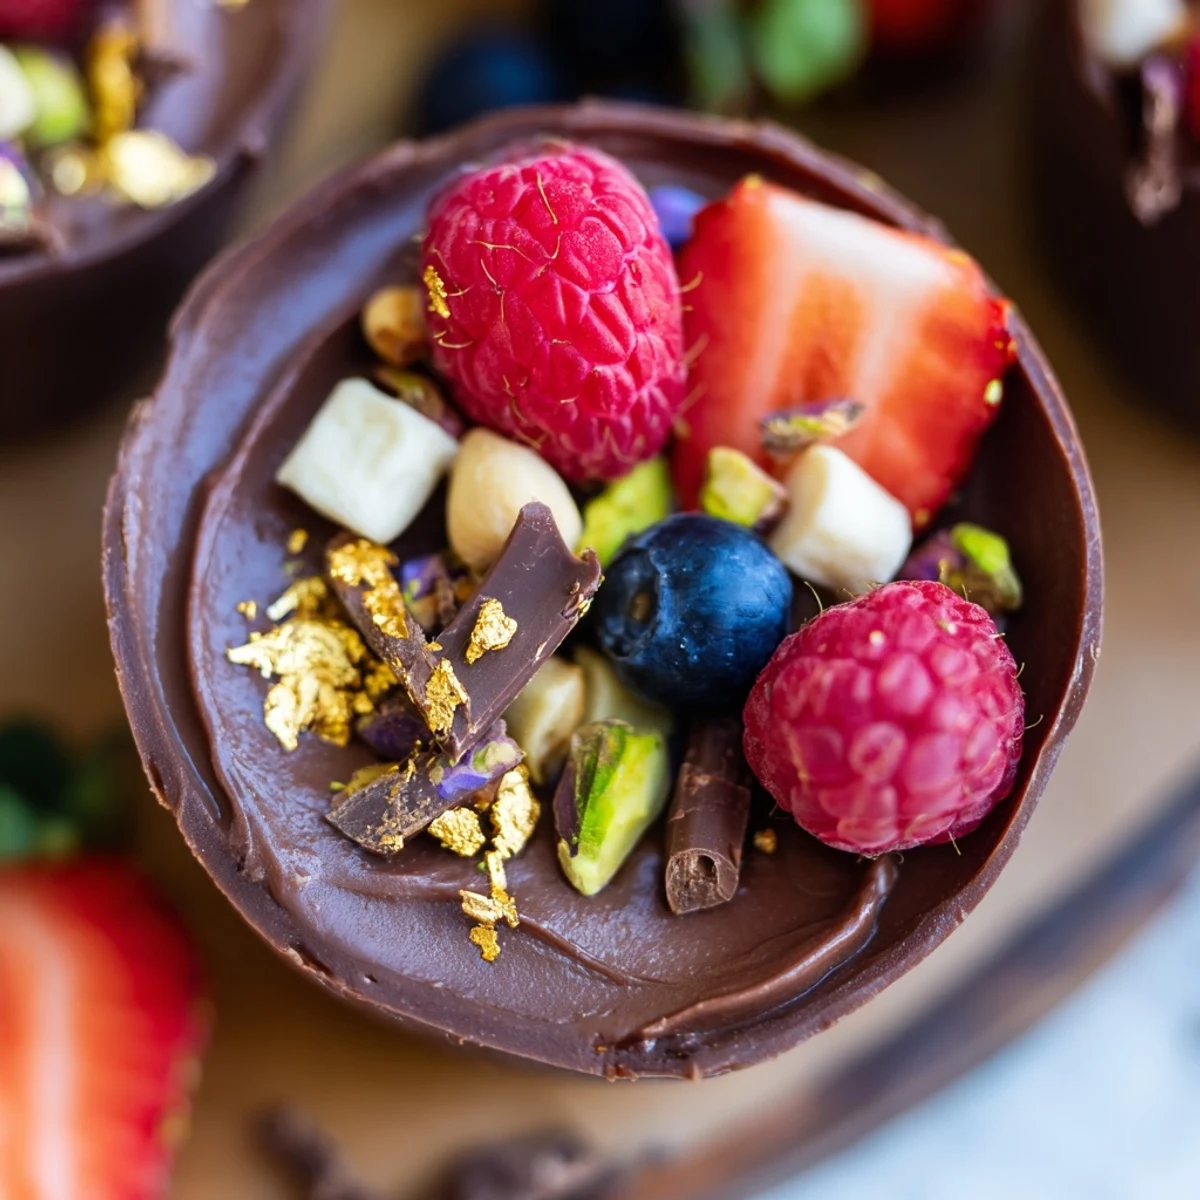
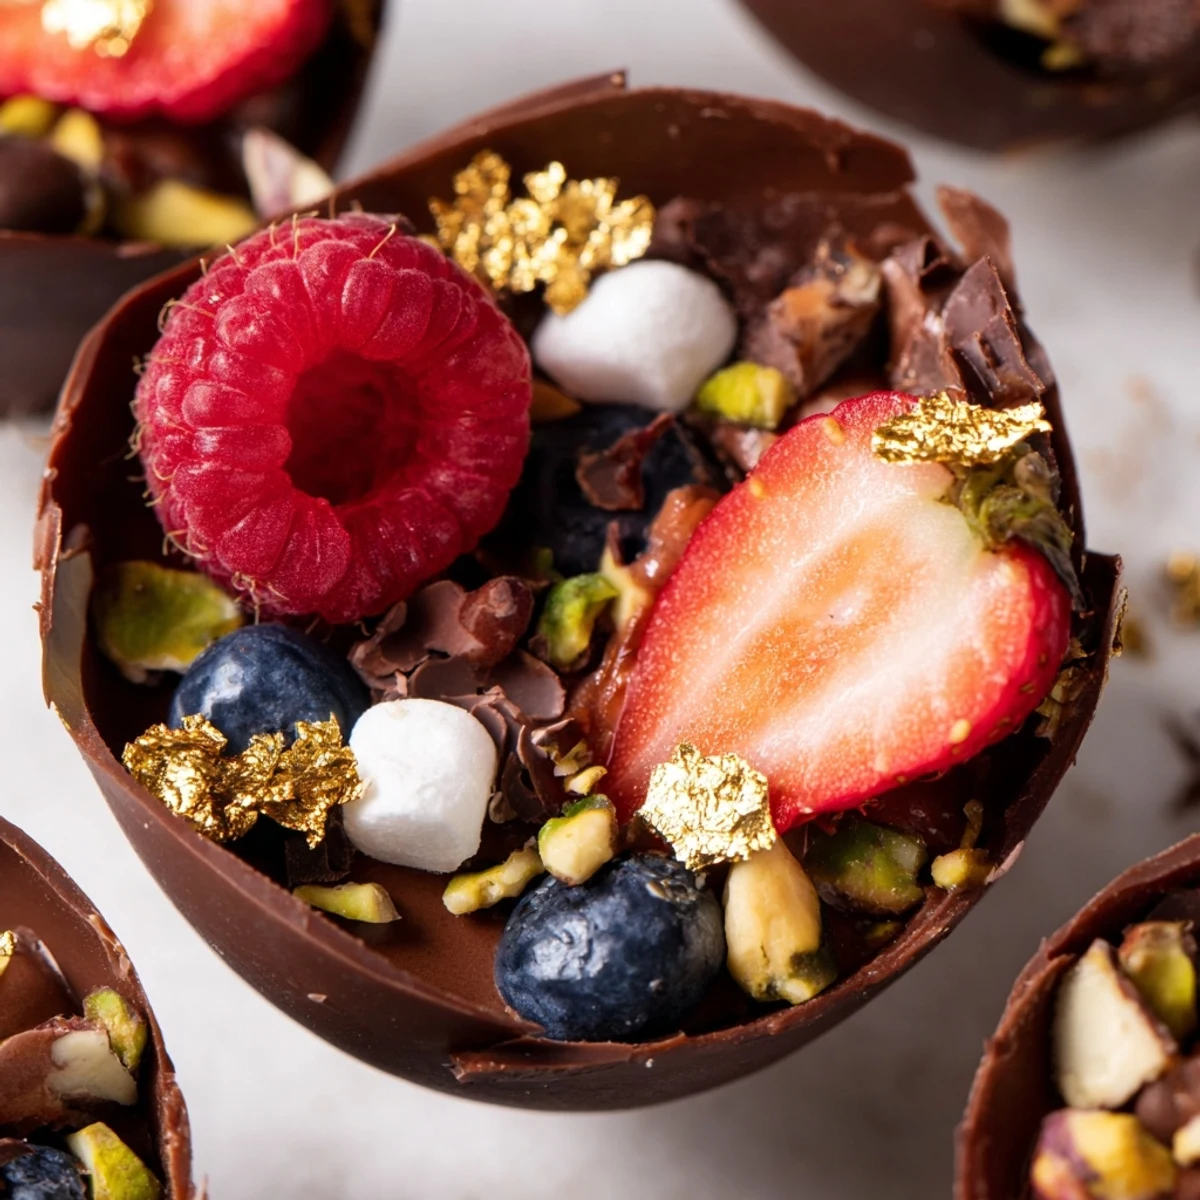
 These decadent chocolate grazing cups combine the artistry of chocolate work with the playful concept of grazing-style dining. Start by crafting delicate edible cups from melted dark chocolate, then fill them with silky chocolate mousse whipped to perfection. The real magic happens in the toppings—fresh mixed berries bring brightness and tartness, toasted nuts add satisfying crunch, while mini marshmallows and chocolate curls contribute sweetness and visual appeal. For special celebrations, finish with edible gold leaf or pearls for an ultra-luxurious touch. The individual portions make them perfect for dessert tables, allowing guests to customize their experience. Best assembled the same day for optimal texture, though the chocolate cups can be prepared ahead and stored carefully.
The summer my niece turned eight, she declared she wanted a dessert bar instead of a birthday cake. I spent the afternoon hovering over the stove, tempering chocolate and coating cupcake liners with what felt like precious gold. Those chocolate cups emerged from the fridge with this glossy finish that made everyone gasp, and suddenly my kitchen became the most popular room in the house.
Last New Year's Eve, I set up a grazing station with these cups and watched my normally dessert-averse husband light up. The beauty of these cups is that each person can customize their toppings, so my sister loaded hers with extra marshmallows while my dad stuck to the sophisticated berries and nuts. The table went quiet as everyone took that first bite.
Ingredients
- 200 g dark chocolate (at least 60% cocoa), chopped: Higher cocoa percentage gives you that sophisticated bittersweet note and creates a sturdier cup shell that holds its shape beautifully
- 200 ml heavy cream: Cold cream whips up faster and holds air better, so pop it in the freezer for 10 minutes before you start
- 100 g dark chocolate, chopped: This melts into the mousse base, so choose something you genuinely love eating on its own
- 2 tbsp powdered sugar: Powdered sugar dissolves instantly into the cream without leaving those pesky granulated sugar crystals
- 1 tsp vanilla extract: Pure vanilla makes all the difference here, blooming the flavor in the rich chocolate
- 1 cup fresh mixed berries: The tartness cuts through all that richness, so go for slightly underripe berries if you can find them
- 2 tbsp chopped nuts: Toast them for 3 minutes in a dry pan first, and that nutty flavor becomes way more pronounced
- 2 tbsp mini marshmallows: These bring this playful squishiness that reminds everyone of childhood hot chocolate nights
- 2 tbsp chocolate curls or shavings: Use a vegetable peeler on room temperature chocolate for the most effortless elegant curls
- 1 tbsp edible gold leaf or pearls (optional): These add that restaurant worthy sparkle that makes people reach for their phones immediately
Instructions
- Craft the chocolate cups:
- Melt your chocolate in 30 second bursts, stirring between each one until it's glossy and smooth, then grab a pastry brush and coat the inside of each cupcake liner with an even layer that's thick enough to hold together but thin enough to break through with a spoon.
- Chill the cups:
- Slide your tray into the refrigerator for exactly 20 minutes, checking that the chocolate has lost its shine and feels firm to the touch before attempting to remove the liners.
- Prepare the mousse base:
- Gently melt your second batch of chocolate until it's just warm and pourable, then set it aside to cool while you whip the cream until it forms soft peaks that droop slightly from your whisk.
- Combine the mousse:
- Stir a dollop of whipped cream into your melted chocolate to loosen it up, then gently fold the chocolate mixture back into the remaining cream until no streaks remain and everything looks silky and uniform.
- Fill the cups:
- Pipe or spoon the mousse into each chocolate shell until it reaches about two thirds full, leaving enough room for those gorgeous toppings without making everything overflow when people take their first bite.
- Add the finishing touches:
- Arrange your berries, nuts, marshmallows, and chocolate curls on top of each cup, letting some elements cascade over the edges for that abundant grazing table aesthetic that makes these feel so celebratory.
- Final chill:
- Refrigerate everything for at least 20 minutes more, which lets the mousse set properly and makes the chocolate cups easier to handle when you're transferring them to your serving platter.
 Pin This
 My friend Sarah asked me to make these for her wedding shower, and I think the prep time was half giddiness and half panic. When the guests walked in and saw the tower of chocolate cups glittering under the venue's lights, someone actually gasped. That moment of watching people choose their toppings like kids in a candy shop made every minute of chocolate covered fingers worth it.
Making Them Your Own
I've experimented with white chocolate cups filled with raspberry mousse for summer brunches, and milk chocolate versions with salted caramel swirls for autumn gatherings. The shell technique works with any chocolate, so think about the flavor profile you want to build and let your creativity guide you. Some of my best variations came from whatever was languishing in my pantry.
Getting Ahead
You can make the chocolate cups up to three days in advance, storing them between layers of parchment paper in an airtight container. The mousse holds beautifully for 24 hours in the refrigerator, though I recommend adding the fresh berries and marshmallows no more than an hour before serving. That way, everything stays at peak freshness and texture.
Plating Ideas
I love arranging these on a wooden board or marble slab with extra berries scattered around for that abundant grazing aesthetic. Consider height variations using cake stands or pedestals, which makes the display feel more dynamic and restaurant quality. The visual impact of seeing all those toppings waiting to be enjoyed is half the fun.
- Set out small tongs or picks so guests can customize their own cups
- Keep a few extra chocolate cups on hand in case any break during peeling
- Label any unusual toppings or allergens for guests with dietary restrictions
 Pin This
 Every time I serve these, someone asks for the recipe, and I love watching their reaction when I explain how simple they actually are to make. There's something magical about transforming basic ingredients into something that feels like pure celebration.
Recipe FAQs
- → Can I make the chocolate cups ahead of time?
-
Yes, you can prepare the chocolate cups up to 2-3 days in advance. Store them in an airtight container at cool room temperature, separated by parchment paper to prevent sticking. Avoid refrigeration as this can cause condensation and bloom on the chocolate surface.
- → What other chocolates work for this dessert?
-
While dark chocolate provides the best structural integrity and rich flavor balance, you can substitute milk or white chocolate. Keep in mind that white chocolate cups are more delicate due to higher cocoa butter content, and milk chocolate may become too soft in warm environments. Consider the overall sweetness when making substitutions.
- → How do I prevent the chocolate cups from cracking?
-
Ensure your chocolate is properly tempered before coating the liners. Work in a cool room around 68-70°F (20-21°C) and apply even, thin layers rather than thick ones. Allow adequate chilling time between coats if building up thickness. Gentle handling when removing liners is essential—peel slowly from the top edge downward.
- → Can I make these without silicone liners?
-
If you don't have silicone liners, you can use paper cupcake liners or create freeform cups using inverted small bowls lined with parchment. Simply brush the melted chocolate onto the prepared surface, chill until set, then carefully remove. The inverted bowl method creates slightly larger, more dramatic cups perfect for generous portions.
- → What other topping combinations work well?
-
The beauty of grazing cups lies in their versatility. Try crushed cookies, caramelized nuts, toasted coconut flakes, freeze-dried fruit pieces, candied citrus peel, or even small macarons. Seasonal toppings like pomegranate arils in winter or fresh figs in autumn create stunning variations. Consider flavor themes like tropical with mango and toasted coconut, or autumnal with spiced nuts and apple chips.
- → How long can the assembled cups sit out?
-
Once assembled, these cups should be served within 2-3 hours if kept at room temperature, as the mousse may soften and lose structure. For extended service periods, display them on chilled platters or over ice. In warm weather, limit room temperature time to 1 hour and keep guests' plates chilled. The mousse contains cream which requires proper food safety consideration.